How to Swim Elementary Backstroke- Technique, Drills & Tips
The elementary backstroke technique is a beginner swimming style in which you swim on your back then propel yourself with both arms and legs working in unison while you head is slightly above the water.
It’s a basic yet the most relaxing swimming style which expends minimal energy as breathing is easy. Owing to its nature of propulsion, it’s one of the slowest strokes.
Following are details on how to swim this stroke; the technique which includes body position, arm and leg movement, breathing plus tips, drills, benefits, uses history and much more.
Technique
The elementary backstroke is a good starting point as it has gone through very few modifications since its inception. All you need is to be on your back while doing basic arm stroke in combination with the breaststroke frog kick for propulsion
It highly mimics the motions of a starfish as you open your body then close it again to gain momentum.
1. Arm Movements
The arms and legs move in three main stages followed by a gliding stage. The first three stages are active stages but the last one is a phase in which you just glide backwards. These motions are often related to the movements of animals such as monkeys or chicken for ease of remembrance.
The first phase of the movement starts with your arms resting by your side. In this position, your palms are facing your body and your legs are extended but together. Start by bending your elbows on the horizontal plane and move your hands towards your rib area. This movement mimics the movement of a chicken. It should appear like you want to tickle yourself.
In the second active phase of the arms, you should extend your arms sideways to form the shape of an airplane. In this position, your arms ought to be facing towards your feet. The second phase of your movement generates part of the propulsion to move you forwards.
In the third major phase of the movement, the arms more towards the feet to generate propulsion towards your head. Throughout this move, ensure that your palms are facing your feet and remain straight. The last position for the arms should be by your hips.
After this, the hands move into the recovery phase in which they stay by your hips while your body glides towards your head. This recovery phase occurs for the feet as well. After this, you start a new cycle from the first active phase to the recovery phase.
2. Leg Movements
Just like the arms, your legs move in three active phases followed by a recovery phase. The movements of the feet should be synchronized with those of the arms to generate maximum propulsion for the body. For this to occur, the start of the active phase of the arms should occur at the same time as those of the feet.
The first active phase entails bending your knees and bringing them towards your center line. The feet should move towards your groin area. There should be minimal perpendicular movements on the feet in this state. The movement created in the feet in this first phase is similar to that of a monkey getting ready to jump off.
The second phase of the active stage of the feet entails moving them apart while still keeping them bent at the knees. The minimal area created is to reduce the opposing propulsion force created by the legs as it’ll be against your actual direction.
The third phase entails pulling the legs together such that they end up straight and together like in the initial stage of the move. To increase the propulsion force, let the soles of your feet face each other without bending your knees. This increases the surface area of your feet hence more force.
The last phase entails holding the straight position and gliding towards your head for a while before starting the next stroke.
3. Body Movements
There are few movements of the body throughout the strokes of this style. The majority of the work is done by the hands and feet with the torso and head remaining straight at all times.
The aim is to keep the body as flat as possible.
The main mistake made is that swimmers tend to dip their hips in the water. Doing so increases the amount of drag on your body hence reducing your speed significantly. While the body will naturally tend to slightly dip in the water at the hips, your task should be keeping it straight by pressing your back into the water and raising your hips slightly.
A flat profile also allows you to generate the maximum power possible from your strokes. This is because, when you flap your arms when horizontal, the force will be translated to a push on the water away from your body. If you’re not flat, the force will push the water downwards which isn’t the right direction for your body.
4. Breathing
This is the easiest of all swimming styles when it comes to breathing. The fact that you’ll always be on your back and there is little turbulence in the water to risk it entering your nose means that you’re very safe as a beginner or just when drifting on the water.
However, the clever thing to do with any swimming stroke is to time the breathing with the strokes. This helps you conserve energy and reduce tension from the body. As a beginner, your aim is to get the basics right. These include floating which becomes easier without tension in the body.
You’re thus best suited to breathing in the first active phase. In this phase, your arms will be close to your ribs and the feet close to your bottom. As for the exhaling, you should do it slowly and steadily for the rest of the stroke which entails sweeping your feet and arms together then sliding for a while. With time, you’ll get it right quite easily.
5. Starting
The start for this stroke is similar to that of the conventional backstroke. You start by holding unto the bars of the swimming pool while facing away from the pool. Your feet should be anchored on the wall of the pool with only the heels touching the water.
Your feet should be touching the wall at the front foot such that your ankles can get a spring effect. The knees should be bent at a 90-degree angle for the best spring backwards. The back is arched with the elbows at less than 90 degrees to allow for the same backwards spring.
Once you jump backwards into the water, you land with your feet and hands first. The back should thus arch outwards and the hands stretched over your head. As you land on the water, you keep your body straight with overhead arms then do a flutter kick for a while before starting the strokes.
For beginners who can’t master this stroke, simply lying on the water on their backs then starting to stroke the water is another great option. The fact that it’s currently not used in competitions means that you’ll often not need the elaborate start-off routine.
6. Turning and Finishing
For the turn, you’re allowed to turn on your belly then touch the wall of the pool with both hands at the same time or one at a time. Initially, you were needed to touch the wall with both hands while still on your back.
After touching the wall, you then bring up your legs to the wall then push yourself backwards. The first few meters of the move will entail moving backwards with the hands and feet straight and close to your body for a gliding period before you start stroking again.
The finish requires touching the wall with both hands at the same time and on a horizontal plane.
These techniques are easy to master given the relaxed nature of the swimming stroke. In fact, the hands can have floaters to make it easy to float for swimmers who’re yet to master the basics of swimming.
Elementary Backstroke Tips & Drills
Already a simple swimming style, the elementary backstroke can be made better with a few improvements on how to do the basics. Given that it’s taught to beginners, there are many mistakes they make which either slows them down or affects their overall routine.
The tips include the following:
1. Learn to float first
Before starting the strokes, you must know how to float in different ways. That includes floating on your back, on your stomach, and with your bottom upwards like a jellyfish. Floating is an important role in how you perform the elementary backstroke and should be mastered first.
One way to learn how to float is to do so in the shallow end of a pool without currents. This way, whenever you lose your balance, you can easily reach out and touch the floor to regain your balance.
2. Start with a floater
The floater can be fastened to your arms to keep your upper body above the water. You don’t need to have a large floater for this one as the small ones are enough to keep you afloat. If you have the large one, fasten it on your upper chest area to keep it up.
3. Practice the strokes out of the water
The starfish-like motions of this style are doable even outside the water. You can do it in the sand, on your bed or just about any place that won’t damage you. Once you master them, you can head out to the water to perform them.
Beside these tips, the general tips of swimming such as keeping as slim a profile as possible in water apply.
Elementary Backstroke Benefits & Uses
Besides teaching people how to swim well, the elementary backstroke helps you recover from injury and other issues affecting the back as it doesn’t require much input from the back but helps work out the rest of the body.
Other benefits of this stroke include;
- It is generally a good exercise. You can use to tone your back, shoulder, arm and leg muscles
- It is used for leisure. It is in fact, one of the best stroke for relaxing in water
- It builds up your water confidence
- It is a lifesaving and survival stroke owing to the fact that you can move in water for a long time without tiring quickly
Elementary Backstroke vs Backstroke
The starting position for the elementary backstroke is very much similar to that of the conventional backstroke. As with the conventional backstroke, you start on your back.
The main difference between the two styles is the direction of the movement of the legs and hands. In the conventional style, your hands move up and down in circles. In the elementary style, your hands and legs will be moving sideways instead.
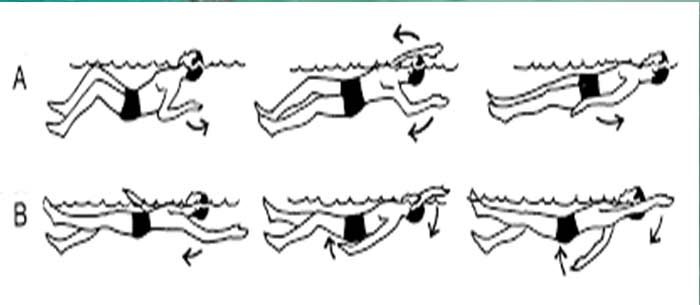
However, the same swimming principles applicable to the conventional style apply to this one. These include keeping your body on the horizontal plane as much as possible and reducing drag by minimizing perpendicular movements.
History
While it may be as old as the conventional backstroke, the elementary backstroke was the first used in a competitive context in the 1900 and 1908 Olympics. After 1908, the elementary backstroke would be superseded in popularity by the conventional backstroke. As of today, the elementary backstroke is not used in competitive sporting events.
The reason the elementary backstroke gained popularity during the early 1900s was because moving both arms in the conventional backstroke was found to be faster than moving one arm at a time. Swimmers would thus generate more power with the double stroke hence move faster within the power phase of the stroke.
However, the reason this type of backstroke fell in popularity again was due to the slow nature of the recovery phase. The fact that there’s a stage within which the arms aren’t generating propulsion meant that the swimmer would slow down. The overall speed would thus be slower than the conventional backstroke.
Today, the elementary backstroke style is reserved for recreational purposes and teaching children how to swim and generally beginners. The fact that it’s easy and fun to do makes it a favorite for children and other swimming beginners.
Finally, the elementary backstroke style is a good place to start your swimming journey. Once you can float around with ease, turn on your belly and learn the freestyle stroke.
From here, you’ll be ready for the more difficult swimming styles. The elementary stroke helps you master the basics which are breathing rhythms and floating on water. These two are among the most inhibitive aspects to master for beginners.
Further Reading
Following is a list of articles with more swimming information and other water sports
Swimming Strokes/Styles
- Different Types of Swimming Strokes, Styles & Names
- What is Sculling in Swimming? How to do it
- How to Tread Water- Techniques, Benefits & Exercises
- How to Swim Freestyle: Technique, Tips & Drills
- How to Swim Breaststroke: Kick, Pull, Form, Drills & Tips
- Butterfly vs Breaststroke Swimming
- How to Swim Sidestroke-Technique,Trudgen &Combat Drills & Tips
- How to Swim Backstroke-Technique, Drills & Tips
- How to Swim Butterfly: Technique, Drills & Tips
Swimming FAQs & Ideas
- How Many Calories Does Treading Water Burn?
- Can you Swim with Contacts in the Ocean/Pool?
- Can you Open your Eyes in the Salty Ocean or Chlorinated Pool Waters?

